14 Februari 2009

Design Magazine BLogger

Setelah berhasil dalam obrak-abrik Minima yang mana tutorialnya sudah saya posting dalam 4 (empat) tahapan yaitu : Prosedure Modifikasi Minima bag I s/d IV (dapat diikuti pada Sidebar blog ini), kali ini saya mencoba obrak-abrik MINIMA Blogger lagi.

Pada modifikasi kali ini, saya mencoba membagi bagian MAIN menjadi Empat Kolom yang meliputi Main Left (bagian posting), Featured, Main Right I dan II. Pada bagian footer saya bagi menjadi tiga bagian yang saya modifikasi untuk menampilkan gadget Bloglist.

Modifikasi ini masih terus saya kembangkan, agar nantinya bisa didownload oleh rekan-rekan blogger sekaligus sumbangan saya bagi perbendaharaan Template Blogger.

Dan apabila nantinya berhasil, tentu Insya Allah saya akan mencoba membagi Tips modifikasi secara Sharing dengan membuat tuturialnya.

Dukungan dari rekan-rekan blogger saya harapkan

DEMO LIVE

09 Februari 2009

Free MAGAZINE BLOGGER

Setelah saya mencoba untuk sharing bagaimana cara memodifikasi template minima menjadi sebuah template yang dapat dibilang sebagai sebuah MAGAZINE untuk blogger ( Menurut saya kali ), kali ini saya mencoba untuk memberikan perbendaharaan template EDEL2XMinima tersebut agar bisa di download oleh rekan-rekan blogger.

Saya tidak perlu panjang lebar dalam menjelaskan tentang template ini, karena dapat anda pelajari dalam Prosedur Modifikasi Minima yang sudah saya posting sebelumnya.

Silahkan anda modifikasi, dan ingat.... bila ternyata modifikasi anda lebih bagus daripada modifikasi yang saya kerjakan, jangan PELIT untuk menularkan ke saya dan rekan-rekan blogger.

Untuk Headernya silahkan anda ganti sesuai image anda, karena sudah ada tutorialnya jadi saya tidak perlu menjelaskan lagi.


LIVE DEMO / DOWNLOAD

07 Februari 2009

Fulfillment overview

Fulfillment, also known as order fulfillment or product fulfillment, is the process by which a person or company to meet their obligations to send the items or products that people have been ordered, purchased, or requested from the organization.
Order fulfillment is the most complete in the sense that the investigation process from the point of sale for the product to the customer. Order fulfillment sometimes used more narrowly to describe the action or logistic distribution function, but, in the broader sense refers to the way companies respond to customer orders.

Fulfillment will usually refer to the services provided by a company that offers to store, receive orders, package, and means of transportation, such as a cargo ship to send to the end consumer.

Fulfillment companies usually will not take full responsibility for damage to the product unless they are directly responsible, and take full responsibility for product shrinkage, unless you can prove that they are directly responsible. This practice will vary depending on the acceptance of the procedure used by the fulfillment companies. Usually considered to verify if the fulfillment companies, they will accept responsibility for the larger items in their care, but if they receive the package to include an accurate list of inventory, they will not be responsible as the depreciation.

Fulfillment companies act as a shipping center for their client companies. If there are errors in the process of delivery or poor handling procedures, it will become a client company that will receive a bad reputation

Most order fulfillment service providers will make a list of "standard cartons" available to to their customers. If your product does not fit in this package, you will need to provide your own packaging, or to pay an additional charge.

Many "Fulfillment companies" that we can find on the internet, such as AMS Fulfillment. AMS Fulfillment is a leading 3rd party fulfillment services company. AMS Fulfillment offers warehousing, inventory management, and fulfillment services. Please contact the party, when you need it.

06 Februari 2009

Header animation with A. Photoshop CS3

Sharing kali ini akan membahas bagaimana membuat Animasi Header pada Prosedur Modifikasi Minima yang diberi judul "Edel2XMinima". Tentu disini saya menggunakan Adobe Photoshop CS3 yang saya rasa aplikasi ini sudah banyak dikenal.

1. Buat file baru dengan ukuran 470px X 100 px dengan background transparan, sesuai kelebaran dari pada ruang Headerleft pada modifikasi Minima menjadi Magazine "Edel2XMinima" Blogger. Buat dua buah layer dimana untuk layer 1 berfungsi sebagai background transparan.

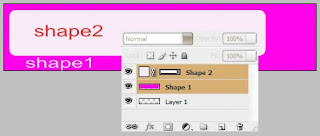
2. Kita akan sesuaikan warna dasar dari pada header dengan klik "Set Foreground Color" pada toolbar dan warna yang dipilih adalah ungu (#fe02e9). Langkah selanjutnya klik "Rectangle Tool" lalu blok Layer2 sehingga Layer2 berubah nama menjadi "Shape1". Klik kanan pada layer tersebut kemudian pilih 'Resterize Layer".

3. Buat layer baru diatas "Shape1", kemudian rubah warna Foreground dengan warna putih (#ffffff). Kemudian klik "Rounded Rectangle Tool" dan buat bidang pada layer baru tersebut sehingga secara default bernama "Shape2". Dengan menekan tombol "Ctrl" pada keyboard, seleksi layer Shape1 dan Shape2, kemudian tekan 'Ctrl E" maka kedua layer akan menyatu dengan nama "Shape2".


4. Pada toolbar, klik "Magic Wand Tool" kemudian seleksi shape yang berwarna putih lalu tekan "Del" pada keyboard sehingga shape tersebut hilang dan nampak background transparan.


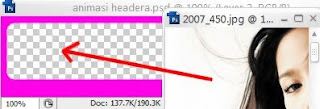
5. Pada "File" klik "Open" untuk memasukkan gambar yang kita kehendaki. Setelah jendela gambar terbuka, klik "Restore Down" pada sudut kanan atas jendela kerja sehingga dua jendela sama-sama terbuka. Dengan bantuan "Move Tool" pindahkan gambar ke jendela I, kemudian ganti nama layernya dengan nama "Gambar1".


6. Pindahkan posisi layer "Gambar1" dibawah layer "Shape2", kemudian dengan "Ctrl T" atur posisi gambar sedemikian rupa sehingga pantas dan enak dipandang.

7. Ulangi langkah 5 dan 6 untuk memasukkan gambar yang lain dan ingat posisi layer gambar harus dibawah layer Shape2. Saya sarankan jangan terlalu banyak gambar.

8. Langkah selanjutnya kita akan membuat animasi pada gambar yang sudah diatur dengan klik 'Windows" kemudian pilih "Animation". Setelah muncul jendela Animasi, klik pada "Duplicat Selected Frames" untuk membuat Frame ke-2. Pada saat Frame ke-2 terseleksi, klik Icon mata disamping layer gambar5, sehingga Icon mata disembunyikan.


9. Ulangi langkah 8 untuk membuat Frame 3 (dari frame2) dan Icon mata gambar4 disembunyikan. Lakukan langkah ini hingga sampai dengan Frame5, namun pada frame5 Icon mata pada gambar1 tidak disembunyikan.

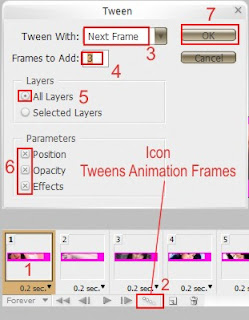
10. Atur "Delay = 0,2 Sec" pada tiap masing-masing frame. Selanjutnya seleksi Frame1, kemudian klik "Tweens Animation Frames" sehingga muncul jendela TWEEN.
Pada jendela Tween isi Tween With = Next Frame, Frames to Add = 3, tandai lingkaran "All Layers" pada Layers. Pada Parameters tandai semua lingkaran kemudian klik OK.
Langkah ini akan menambahkan 3 frame sekaligus pada Frame1.


11. Ulangi langkah 10 pada Frame5, Frame9, Frame13 dan Frame17. Silahkan klik Icon "Play Animation" untuk melihat hasilnya.

12. Setelah sesuai, silahkan klik "File" lalu "Save for Web And Devices" dan pilih GIF pada optimized file format. Kemudian upload di Photobucket. Maka hasilnya akan seperti dibawah ini :


13. Tambahkan kode html yang kita dapat dibagian ini :

<div class='headerleft'>
&lt;img src=&quot;http://i288.photobucket.com/albums/ll179/ahnning/header-CA-animasi.gif&quot; border=&quot;0&quot; alt=&quot;Photobucket&quot;&gt;
</div>

Kode dengan warna merah adahal URL dari gambar yang telah kita upload.

Semoga bermanfaat dan selamat bereksperimen.

29 Januari 2009

Prosedur Modifikasi MINIMA (III)

Merombak susunan Header.

Pada kesempatan Prosedur Modifikasi Minima (III) kali ini kita akan membahas bagaimana kita merombak susunan headernya, yang semula utuh akan kita bagi menjadi dua ruang.

Langkah yang harus kita lakukan adalah mengganti susunan Header Minima asli dari :

/* Header
-----------------------------------------------
*/

#header-wrapper {
...... dst ..... s/d ......


#header img {
margin-$startSide: auto;
margin-$endSide: auto;
}

dengan kode dibawah ini :

#header {
background: #ff55dd url(http://i288.photobucket.com/albums/ll179/ahnning/hdbg.png);
width: 980px;
height: 100px;
color: #FFF;
font-size: 11px;
margin: 0;
padding: 0;
overflow: hidden;
}
#header-inner {
background-position: left;
background-repeat: no;
}
#header h1 {
color: #FFF;
font-size: 36px;
font-family: Georgia, Times New Roman;
font-weight: normal;
margin: 0;
padding: 15px 0 0 20px;
text-decoration: none;
}
#header h1 a, #header h1 a:visited {
color: #FFF;
font-size: 36px;
font-family: Georgia, Times New Roman;
font-weight: normal;
margin: 0;
padding: 0;
text-decoration: none;
}
#header h1 a:hover {
color: #FFF;
text-decoration: none;
}
#header h3 {
color: #A91B33;
font-size: 16px;
font-family: Arial, Tahoma, Verdana;
font-weight: normal;
margin: 0;
padding: 0;
}

#header p {
color: #FFF;
padding: 0 0 5px 20px;
margin: 0;
line-height: 20px;
}

.headerleft {
width: 480px;
float: left;
font-size: 14px;
margin: 0;
padding: 0;
}

.headerleft a img {
border: none;
margin: 0;
padding: 0;
}

.headerright {
width: 486px;
float: right;
margin: 0;
padding: 18px 0 0;
font-weight: bold;
}
.headerright a img {
border: 1px solid #FFF;
margin: 0 0 3px;
padding: 0;
}
#header .description {
color: #A91B33;
font-size: 16px;
font-family: Arial, Tahoma, Verdana;
font-weight: normal;
margin-left: 25px;
padding: 0;
}


Kemudian kita juga akan menambahkan Nav bar dibawah header dengan menambahkan kode dibawah ini :


/*navigasi
-----------------------------*/


#NavbarMenu {
background: #bd027d;
width: 980px;
height: 35px;
font-size: 12px;
font-family: Arial, Tahoma, Verdana;
color: #FFFFFF;
font-weight: bold;
margin: 0px;
padding: 0px;
}

}
#NavbarMenuleft {
width: 680px;
float: left;
margin: 0px;
padding: 0px;
}

#NavbarMenuright {
width: 300px;
font-size: 11px;
float: right;
margin: 0px;
padding: 6px 0px 0px 0px;

}
#nav {
margin: 0px;
padding: 0px;
}

#nav ul {
float: left;
list-style: none;
margin: 0px;
padding: 0px;
}

#nav li {
list-style: none;
margin: 0px;
padding: 0px;
}

#nav li a, #nav li a:link, #nav li a:visited {
color: #f9ea01;
display: block;
font-size: 16px;
font-family: Georgia, Times New Roman;
font-weight: normal;
text-transform: lowercase;
margin: 0px;
padding: 9px 15px 8px 15px;
}

#nav li a:hover, #nav li a:active {
background: #EBE6D4 url(images/navhov.png);
color: #495D5C;
margin: 0px;
padding: 9px 15px 8px 15px;
text-decoration: none;
}

#nav li li a, #nav li li a:link, #nav li li a:visited {
background: #E1DCCA;
width: 150px;
color: #495D5C;
font-size: 14px;
font-family: Georgia, Times New Roman;
font-weight: normal;
text-transform: lowercase;
float: none;
margin: 0px;
padding: 7px 10px 7px 10px;
border-bottom: 1px solid #FFFFFF;
border-left: 1px solid #FFFFFF;
border-right: 1px solid #FFFFFF;
}

#nav li li a:hover, #nav li li a:active {
background: #85ACAC;
color: #FFFFFF;
padding: 7px 10px 7px 10px;
}

#nav li {
float: left;
padding: 0px;
}

#nav li ul {
z-index: 9999;
position: absolute;
left: -999em;
height: auto;
width: 170px;
margin: 0px;
padding: 0px;
}

#nav li li {
}

#nav li ul a {
width: 140px;
}

#nav li ul a:hover, #nav li ul a:active {
}

#nav li ul ul {
margin: -32px 0 0 171px;
}

#nav li:hover ul ul, #nav li:hover ul ul ul, #nav li.sfhover ul ul, #nav li.sfhover ul ul ul {
left: -999em;
}

#nav li:hover ul, #nav li li:hover ul, #nav li li li:hover ul, #nav li.sfhover ul, #nav li li.sfhover ul, #nav li li li.sfhover ul {
left: auto;
}

#nav li:hover, #nav li.sfhover {
position: static;
}

#searchform {
margin: 0;
padding: 0;
overflow: hidden;
display: inline;
}
#searchbox {
background: #EEE !important;
width: 220px;
color: #202020;
font-size: 12px;
font-family: Georgia, Times New Roman, Trebuchet MS;
font-weight: normal;
margin: 0;
padding: 4px 0 3px 5px;
border-top: 1px solid #DDD;
border-right: 1px solid #666;
border-left: 1px solid #DDD;
border-bottom: 1px solid #666;
display: inline;
}
#searchbutton {
background: #fc06b9;
color: #FFF;
font-size: 11px;
font-family: Georgia, Times New Roman, Trebuchet MS;
margin: 0 0 0 5px;
padding: 3px 3px 2px;
font-weight: bold;
border-top: 1px solid #DDD;
border-right: 1px solid #666;
border-left: 1px solid #DDD;
border-bottom: 1px solid #666;
}
#subscribe {
margin: 0;
padding: 5px 0 0;
overflow: hidden;
}
#subbox {
background: #EEE !important;
width: 200px;
color: #202020;
font-size: 12px;
font-family: Georgia, Times New Roman, Trebuchet MS;
font-weight: normal;
margin: 5px 0 0;
padding: 3px 0 3px 5px;
border-top: 1px solid #666;
border-right: 1px solid #DDD;
border-left: 1px solid #666;
border-bottom: 1px solid #DDD;
display: inline;
}
#subbutton {
background: #f9099c;
color: #FFF;
font-size: 11px;
font-family: Georgia, Times New Roman, Trebuchet MS;
margin: 0 0 0 7px;
padding: 3px 3px 2px;
font-weight: bold;
border-top: 1px solid #DDD;
border-right: 1px solid #666;
border-left: 1px solid #DDD;
border-bottom: 1px solid #666;
}
#name, #email, #url {
background: #EEE !important;
width: 250px;
color: #202020;
font-size: 12px;
font-weight: normal;
margin: 5px 0 0;
padding: 3px 0 3px 5px;
border-top: 1px solid #666;
border-right: 1px solid #DDD;
border-left: 1px solid #666;
border-bottom: 1px solid #DDD;
display: inline;
}
#submit {
background: #000000;
color: #FFF;
font-size: 11px;
font-family: Arial, Tahoma, Verdana;
margin: 0;
padding: 3px 3px 2px;
font-weight: bold;
border-top: 1px solid #DDD;
border-right: 1px solid #666;
border-left: 1px solid #DDD;
border-bottom: 1px solid #666;
}
#words {
background: #EEE;
width: 460px;
color: #202020;
font-size: 12px;
font-weight: normal;
margin: 5px 0 0;
padding: 3px 0 3px 5px;
border-top: 1px solid #666;
border-right: 1px solid #DDD;
border-left: 1px solid #666;
border-bottom: 1px solid #DDD;
display: inline;
}
#subnavbar {
background: #666666;
width: 980px;
height: 24px;
color: #FFFFFF;
margin: 0px 0px 2px 0px;
padding: 0px;
}

#subnav {
margin: 0px;
padding: 0px;
}

#subnav ul {
float: left;
list-style: none;
margin: 0px;
padding: 0px;
}

#subnav li {
float: left;
list-style: none;
margin: 0px;
padding: 0px;
}

#subnav li a, #subnav li a:link, #subnav li a:visited {
color: #FFFFFF;
display: block;
font-size: 10px;
font-weight: bold;
text-transform: uppercase;
margin: 0px 5px 0px 0px;
padding: 6px 13px 6px 13px;
}

#subnav li a:hover, #subnav li a:active {
background: #85ACAC;
color: #FFFFFF;
display: block;
text-decoration: none;
margin: 0px 5px 0px 0px;
padding: 6px 13px 6px 13px;
}

#subnav li li a, #subnav li li a:link, #subnav li li a:visited {
background: #666666;
width: 140px;
float: none;
margin: 0px;
padding: 6px 10px 6px 10px;
border-bottom: 1px solid #FFFFFF;
border-left: 1px solid #FFFFFF;
border-right: 1px solid #FFFFFF;
}

#subnav li li a:hover, #subnav li li a:active {
background: #85ACAC;
margin: 0px;
padding: 6px 10px 6px 10px;
}

#subnav li ul {
z-index: 9999;
position: absolute;
left: -999em;
height: auto;
width: 160px;
margin: 0px;
padding: 0px;
}

#subnav li li {
}

#subnav li ul a {
width: 140px;
}

#subnav li ul a:hover, #subnav li ul a:active {
}

#subnav li ul ul {
margin: -25px 0 0 161px;
}

#subnav li:hover ul ul, #subnav li:hover ul ul ul, #subnav li.sfhover ul ul, #subnav li.sfhover ul ul ul {
left: -999em;
}

#subnav li:hover ul, #subnav li li:hover ul, #subnav li li li:hover ul, #subnav li.sfhover ul, #subnav li li.sfhover ul, #subnav li li li.sfhover ul {
left: auto;
}

#subnav li:hover, #subnav li.sfhover {
position: static;
}


Langkah selanjutnya adalah merubah susunan kode pada body :

<div id='header-wrapper'>
<b:section class='header' id='header' maxwidgets='1' showaddelement='no'/>
</div>

dengan kode dibawah ini :

<div id='header'>

<div class='headerleft'>
&lt;img src=&quot;http://i288.photobucket.com/albums/ll179/ahnning/header-CA-animasi.gif&quot; border=&quot;0&quot; alt=&quot;Photobucket&quot;&gt;
</div>

<div class='headerright'>

&lt;script type=&#39;text/javascript&#39;&gt;&lt;!--
google_ad_client = &quot;pub-7181952237540333&quot;;
google_ad_host = &quot;pub-1556223355139109&quot;;
/* 468x60, created 6/18/08 */
google_ad_slot = &quot;5864627181&quot;;
google_ad_width = 468;
google_ad_height = 60;
//--&gt;
&lt;/script&gt;
&lt;script src=&#39;http://pagead2.googlesyndication.com/pagead/show_ads.js&#39; type=&#39;text/javascript&#39;&gt;
&lt;/script&gt;

</div>

</div>


Headerleft pada magazine blogger "Edel2xMinima" merupakan background Animasi yang kita buat dengan Adobe Photoshop dan diupload di Photobucket dengan ukuran 475px X 100px (GIF). (akan dibahas selanjutnya bagaimana membuat Animasi header).

Headerrightnya merupakan kode Adsense dengan ukuran 468px X 60px


KODE TAMBAHAN NAVBAR DIBAWAH HEADER :

Selanjutnya kita tambahkan kode dibawah ini :

<div id='NavbarMenu'>
<div id='NavbarMenuleft'>
<ul id='nav'>
<li><a expr:href='data:blog.homepageUrl'>Home</a></li>
<li>
<a href='url anda'>Categori, misalnya Tutorial</a>
<ul>
<li><a href='url anda'>item tutorial anda</a></li>
</ul>
</li>
<li><a href='#'>item Post lainnya</a></li>
</ul>
</div>

<div id='NavbarMenuright'>
<form action='/search' id='searchform' method='get' style='display:inline;'>
<input id='searchbox' maxlength='255' name='q' onblur='if (this.value == &quot;&quot;) {this.value = &quot;Search this website...&quot;;}' onfocus='if (this.value == &quot;Search this website...&quot;) {this.value = &quot;&quot;}' type='text' value='Search this website...'/>
<input id='searchbutton' type='submit' value='GO'/>
</form>

</div>
</div>

<div style='clear:both;'/>

<div id='subnavbar'>
<ul id='subnav'>
<li>
<a href='#'>Community Events</a>
<ul>
<li>
<a href='#'>Sub Category #1</a>
<ul>
<li>
<a href='#'>Sub Sub Category #1</a>
</li>
<li>
<a href='#'>Sub Sub Category #2</a>
</li>
<li>
<a href='#'>Sub Sub Category #3</a>
</li>
</ul>
</li>
<li>
<a href='#'>Sub Category #2</a>
</li>
<li>
<a href='#'>Sub Category #3</a>
</li>
</ul>
</li>
<li>
<a href='#'>item anda</a>
</li>
<li>
<a href='#'>item Anda</a>
</li>
</ul>
</div>

<div style='clear:both;'/>

Pemasangan kode diatas, dibawah kode header diatas dan diatas kode :

<div id='content-wrapper'>

Silahkan dimodifikasi sendiri, dan jangan putus asa.

Mil-Spec Circuit Breakers

Development of the electronics world at this time increasingly sophisticated demands of experts in designing the product quality. Especially in the field of culture in military electronic systems.

Engineers who designed military vehicles and equipment to face the challenges, Circuit Breakers must design the right to protect the device in the computer that ensure reliable performance in mission-critical situation in their military operations.

Unfortunately, many experts assume that the circuit breaker will be ideal to provide protection if meet military specifications, but without the presence or Mil-Spec Circuit Breakers is not the most important election. In fact, designers have to ignore or even exceed Mil-Spec Circuit Breakers in many circuit-protection applications.

More than fifty active military specifications and hundreds of private industry specification applies to Circuit Breakers. However, the understanding of the basic characteristics of Circuit Breakers and a large operation to help designers select the circuit breaker in the most appropriate for their application.

Choosing the correct circuit breaker technology is very important for each application. There are four types of circuit breaker technology to choose from:

* Thermal;
* Thermal-magnetic;
* Magnetic, and
* High-performance.

If you need a military Circuit Breakers, the equipment must comply with all requirements mil-spec. Such as remote control Circuit Breakers (RCCB), which functions as a combination of relay and circuit breaker also considered, this device functions as the control circuits and high power control signal to the cockpit. The relay circuit breaker combination that should remove the power cord, and so will increase efficiency and reduce the weight of the entire system, and the number of components.

Mil-spec Circuit Breakers are available with a wide range of flexible and fully functional features, you can find on the internet.

28 Januari 2009

Need for Web Hosting Tutorials

The need for the Internet at this time is a factor of supporting a business online. When we create a website or blog for business, of course we need a Web Hosting plan we can support it. Setting up a web site hosting account to host your business Web site can be confusing.

We need a Web Hosting Tutorials to help understand the process and guides us through the steps to set up web hosting.

Web Hosting Tutorial covers all the basics of web hosting, how to choose a web host, domain names, and more. Much-needed general information page on the website hosting articles for beginners, to start learning about web hosting, To be able to obtain a better understanding, to learn about how the process of getting a web page or a web site full of computers that have been used for the web server, and the process domain name selection is good, the steps to register domain names and domain names that point to Web sites.

Several articles in the Web Hosting article as a comparison, in order to gain more information can be searched on the internet, so this could increase confidence in our ability to create the site.

As part of NaviSite marketing and product management team, we have some thoughts about the web hosting for the year 2009. Believe that conventional hosting sector will experience a dramatic transformation in 2009. Currently, economic conditions will place small businesses in danger as they struggle to keep pace in this highly competitive and market demand, business will come to realize the importance of relationships and find solutions that are more qualified. For that, we need the web hosting server that has a fast.

Thus, we can not be wrong in making a decision in choosing the Web Hosting services.

Mockup Hijab Adobe Photoshop Tutorial - FREE FILE PSD

  Mockup Hijab Adobe Photoshop adalah tutorial tentang bagaimana cara merubah warna hijab maupun coraknya. Jika anda ingin mendownload file ...