06 Februari 2009

Header animation with A. Photoshop CS3

Sharing kali ini akan membahas bagaimana membuat Animasi Header pada Prosedur Modifikasi Minima yang diberi judul "Edel2XMinima". Tentu disini saya menggunakan Adobe Photoshop CS3 yang saya rasa aplikasi ini sudah banyak dikenal.

1. Buat file baru dengan ukuran 470px X 100 px dengan background transparan, sesuai kelebaran dari pada ruang Headerleft pada modifikasi Minima menjadi Magazine "Edel2XMinima" Blogger. Buat dua buah layer dimana untuk layer 1 berfungsi sebagai background transparan.

2. Kita akan sesuaikan warna dasar dari pada header dengan klik "Set Foreground Color" pada toolbar dan warna yang dipilih adalah ungu (#fe02e9). Langkah selanjutnya klik "Rectangle Tool" lalu blok Layer2 sehingga Layer2 berubah nama menjadi "Shape1". Klik kanan pada layer tersebut kemudian pilih 'Resterize Layer".

3. Buat layer baru diatas "Shape1", kemudian rubah warna Foreground dengan warna putih (#ffffff). Kemudian klik "Rounded Rectangle Tool" dan buat bidang pada layer baru tersebut sehingga secara default bernama "Shape2". Dengan menekan tombol "Ctrl" pada keyboard, seleksi layer Shape1 dan Shape2, kemudian tekan 'Ctrl E" maka kedua layer akan menyatu dengan nama "Shape2".
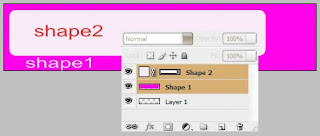

4. Pada toolbar, klik "Magic Wand Tool" kemudian seleksi shape yang berwarna putih lalu tekan "Del" pada keyboard sehingga shape tersebut hilang dan nampak background transparan.


5. Pada "File" klik "Open" untuk memasukkan gambar yang kita kehendaki. Setelah jendela gambar terbuka, klik "Restore Down" pada sudut kanan atas jendela kerja sehingga dua jendela sama-sama terbuka. Dengan bantuan "Move Tool" pindahkan gambar ke jendela I, kemudian ganti nama layernya dengan nama "Gambar1".
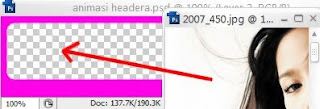


6. Pindahkan posisi layer "Gambar1" dibawah layer "Shape2", kemudian dengan "Ctrl T" atur posisi gambar sedemikian rupa sehingga pantas dan enak dipandang.

7. Ulangi langkah 5 dan 6 untuk memasukkan gambar yang lain dan ingat posisi layer gambar harus dibawah layer Shape2. Saya sarankan jangan terlalu banyak gambar.

8. Langkah selanjutnya kita akan membuat animasi pada gambar yang sudah diatur dengan klik 'Windows" kemudian pilih "Animation". Setelah muncul jendela Animasi, klik pada "Duplicat Selected Frames" untuk membuat Frame ke-2. Pada saat Frame ke-2 terseleksi, klik Icon mata disamping layer gambar5, sehingga Icon mata disembunyikan.


9. Ulangi langkah 8 untuk membuat Frame 3 (dari frame2) dan Icon mata gambar4 disembunyikan. Lakukan langkah ini hingga sampai dengan Frame5, namun pada frame5 Icon mata pada gambar1 tidak disembunyikan.

10. Atur "Delay = 0,2 Sec" pada tiap masing-masing frame. Selanjutnya seleksi Frame1, kemudian klik "Tweens Animation Frames" sehingga muncul jendela TWEEN.
Pada jendela Tween isi Tween With = Next Frame, Frames to Add = 3, tandai lingkaran "All Layers" pada Layers. Pada Parameters tandai semua lingkaran kemudian klik OK.
Langkah ini akan menambahkan 3 frame sekaligus pada Frame1.
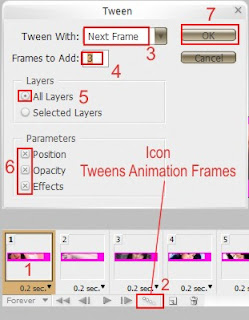


11. Ulangi langkah 10 pada Frame5, Frame9, Frame13 dan Frame17. Silahkan klik Icon "Play Animation" untuk melihat hasilnya.

12. Setelah sesuai, silahkan klik "File" lalu "Save for Web And Devices" dan pilih GIF pada optimized file format. Kemudian upload di Photobucket. Maka hasilnya akan seperti dibawah ini :


13. Tambahkan kode html yang kita dapat dibagian ini :

<div class='headerleft'>
&lt;img src=&quot;http://i288.photobucket.com/albums/ll179/ahnning/header-CA-animasi.gif&quot; border=&quot;0&quot; alt=&quot;Photobucket&quot;&gt;
</div>

Kode dengan warna merah adahal URL dari gambar yang telah kita upload.

Semoga bermanfaat dan selamat bereksperimen.

29 Januari 2009

Prosedur Modifikasi MINIMA (III)

Merombak susunan Header.

Pada kesempatan Prosedur Modifikasi Minima (III) kali ini kita akan membahas bagaimana kita merombak susunan headernya, yang semula utuh akan kita bagi menjadi dua ruang.

Langkah yang harus kita lakukan adalah mengganti susunan Header Minima asli dari :

/* Header
-----------------------------------------------
*/

#header-wrapper {
...... dst ..... s/d ......


#header img {
margin-$startSide: auto;
margin-$endSide: auto;
}

dengan kode dibawah ini :

#header {
background: #ff55dd url(http://i288.photobucket.com/albums/ll179/ahnning/hdbg.png);
width: 980px;
height: 100px;
color: #FFF;
font-size: 11px;
margin: 0;
padding: 0;
overflow: hidden;
}
#header-inner {
background-position: left;
background-repeat: no;
}
#header h1 {
color: #FFF;
font-size: 36px;
font-family: Georgia, Times New Roman;
font-weight: normal;
margin: 0;
padding: 15px 0 0 20px;
text-decoration: none;
}
#header h1 a, #header h1 a:visited {
color: #FFF;
font-size: 36px;
font-family: Georgia, Times New Roman;
font-weight: normal;
margin: 0;
padding: 0;
text-decoration: none;
}
#header h1 a:hover {
color: #FFF;
text-decoration: none;
}
#header h3 {
color: #A91B33;
font-size: 16px;
font-family: Arial, Tahoma, Verdana;
font-weight: normal;
margin: 0;
padding: 0;
}

#header p {
color: #FFF;
padding: 0 0 5px 20px;
margin: 0;
line-height: 20px;
}

.headerleft {
width: 480px;
float: left;
font-size: 14px;
margin: 0;
padding: 0;
}

.headerleft a img {
border: none;
margin: 0;
padding: 0;
}

.headerright {
width: 486px;
float: right;
margin: 0;
padding: 18px 0 0;
font-weight: bold;
}
.headerright a img {
border: 1px solid #FFF;
margin: 0 0 3px;
padding: 0;
}
#header .description {
color: #A91B33;
font-size: 16px;
font-family: Arial, Tahoma, Verdana;
font-weight: normal;
margin-left: 25px;
padding: 0;
}


Kemudian kita juga akan menambahkan Nav bar dibawah header dengan menambahkan kode dibawah ini :


/*navigasi
-----------------------------*/


#NavbarMenu {
background: #bd027d;
width: 980px;
height: 35px;
font-size: 12px;
font-family: Arial, Tahoma, Verdana;
color: #FFFFFF;
font-weight: bold;
margin: 0px;
padding: 0px;
}

}
#NavbarMenuleft {
width: 680px;
float: left;
margin: 0px;
padding: 0px;
}

#NavbarMenuright {
width: 300px;
font-size: 11px;
float: right;
margin: 0px;
padding: 6px 0px 0px 0px;

}
#nav {
margin: 0px;
padding: 0px;
}

#nav ul {
float: left;
list-style: none;
margin: 0px;
padding: 0px;
}

#nav li {
list-style: none;
margin: 0px;
padding: 0px;
}

#nav li a, #nav li a:link, #nav li a:visited {
color: #f9ea01;
display: block;
font-size: 16px;
font-family: Georgia, Times New Roman;
font-weight: normal;
text-transform: lowercase;
margin: 0px;
padding: 9px 15px 8px 15px;
}

#nav li a:hover, #nav li a:active {
background: #EBE6D4 url(images/navhov.png);
color: #495D5C;
margin: 0px;
padding: 9px 15px 8px 15px;
text-decoration: none;
}

#nav li li a, #nav li li a:link, #nav li li a:visited {
background: #E1DCCA;
width: 150px;
color: #495D5C;
font-size: 14px;
font-family: Georgia, Times New Roman;
font-weight: normal;
text-transform: lowercase;
float: none;
margin: 0px;
padding: 7px 10px 7px 10px;
border-bottom: 1px solid #FFFFFF;
border-left: 1px solid #FFFFFF;
border-right: 1px solid #FFFFFF;
}

#nav li li a:hover, #nav li li a:active {
background: #85ACAC;
color: #FFFFFF;
padding: 7px 10px 7px 10px;
}

#nav li {
float: left;
padding: 0px;
}

#nav li ul {
z-index: 9999;
position: absolute;
left: -999em;
height: auto;
width: 170px;
margin: 0px;
padding: 0px;
}

#nav li li {
}

#nav li ul a {
width: 140px;
}

#nav li ul a:hover, #nav li ul a:active {
}

#nav li ul ul {
margin: -32px 0 0 171px;
}

#nav li:hover ul ul, #nav li:hover ul ul ul, #nav li.sfhover ul ul, #nav li.sfhover ul ul ul {
left: -999em;
}

#nav li:hover ul, #nav li li:hover ul, #nav li li li:hover ul, #nav li.sfhover ul, #nav li li.sfhover ul, #nav li li li.sfhover ul {
left: auto;
}

#nav li:hover, #nav li.sfhover {
position: static;
}

#searchform {
margin: 0;
padding: 0;
overflow: hidden;
display: inline;
}
#searchbox {
background: #EEE !important;
width: 220px;
color: #202020;
font-size: 12px;
font-family: Georgia, Times New Roman, Trebuchet MS;
font-weight: normal;
margin: 0;
padding: 4px 0 3px 5px;
border-top: 1px solid #DDD;
border-right: 1px solid #666;
border-left: 1px solid #DDD;
border-bottom: 1px solid #666;
display: inline;
}
#searchbutton {
background: #fc06b9;
color: #FFF;
font-size: 11px;
font-family: Georgia, Times New Roman, Trebuchet MS;
margin: 0 0 0 5px;
padding: 3px 3px 2px;
font-weight: bold;
border-top: 1px solid #DDD;
border-right: 1px solid #666;
border-left: 1px solid #DDD;
border-bottom: 1px solid #666;
}
#subscribe {
margin: 0;
padding: 5px 0 0;
overflow: hidden;
}
#subbox {
background: #EEE !important;
width: 200px;
color: #202020;
font-size: 12px;
font-family: Georgia, Times New Roman, Trebuchet MS;
font-weight: normal;
margin: 5px 0 0;
padding: 3px 0 3px 5px;
border-top: 1px solid #666;
border-right: 1px solid #DDD;
border-left: 1px solid #666;
border-bottom: 1px solid #DDD;
display: inline;
}
#subbutton {
background: #f9099c;
color: #FFF;
font-size: 11px;
font-family: Georgia, Times New Roman, Trebuchet MS;
margin: 0 0 0 7px;
padding: 3px 3px 2px;
font-weight: bold;
border-top: 1px solid #DDD;
border-right: 1px solid #666;
border-left: 1px solid #DDD;
border-bottom: 1px solid #666;
}
#name, #email, #url {
background: #EEE !important;
width: 250px;
color: #202020;
font-size: 12px;
font-weight: normal;
margin: 5px 0 0;
padding: 3px 0 3px 5px;
border-top: 1px solid #666;
border-right: 1px solid #DDD;
border-left: 1px solid #666;
border-bottom: 1px solid #DDD;
display: inline;
}
#submit {
background: #000000;
color: #FFF;
font-size: 11px;
font-family: Arial, Tahoma, Verdana;
margin: 0;
padding: 3px 3px 2px;
font-weight: bold;
border-top: 1px solid #DDD;
border-right: 1px solid #666;
border-left: 1px solid #DDD;
border-bottom: 1px solid #666;
}
#words {
background: #EEE;
width: 460px;
color: #202020;
font-size: 12px;
font-weight: normal;
margin: 5px 0 0;
padding: 3px 0 3px 5px;
border-top: 1px solid #666;
border-right: 1px solid #DDD;
border-left: 1px solid #666;
border-bottom: 1px solid #DDD;
display: inline;
}
#subnavbar {
background: #666666;
width: 980px;
height: 24px;
color: #FFFFFF;
margin: 0px 0px 2px 0px;
padding: 0px;
}

#subnav {
margin: 0px;
padding: 0px;
}

#subnav ul {
float: left;
list-style: none;
margin: 0px;
padding: 0px;
}

#subnav li {
float: left;
list-style: none;
margin: 0px;
padding: 0px;
}

#subnav li a, #subnav li a:link, #subnav li a:visited {
color: #FFFFFF;
display: block;
font-size: 10px;
font-weight: bold;
text-transform: uppercase;
margin: 0px 5px 0px 0px;
padding: 6px 13px 6px 13px;
}

#subnav li a:hover, #subnav li a:active {
background: #85ACAC;
color: #FFFFFF;
display: block;
text-decoration: none;
margin: 0px 5px 0px 0px;
padding: 6px 13px 6px 13px;
}

#subnav li li a, #subnav li li a:link, #subnav li li a:visited {
background: #666666;
width: 140px;
float: none;
margin: 0px;
padding: 6px 10px 6px 10px;
border-bottom: 1px solid #FFFFFF;
border-left: 1px solid #FFFFFF;
border-right: 1px solid #FFFFFF;
}

#subnav li li a:hover, #subnav li li a:active {
background: #85ACAC;
margin: 0px;
padding: 6px 10px 6px 10px;
}

#subnav li ul {
z-index: 9999;
position: absolute;
left: -999em;
height: auto;
width: 160px;
margin: 0px;
padding: 0px;
}

#subnav li li {
}

#subnav li ul a {
width: 140px;
}

#subnav li ul a:hover, #subnav li ul a:active {
}

#subnav li ul ul {
margin: -25px 0 0 161px;
}

#subnav li:hover ul ul, #subnav li:hover ul ul ul, #subnav li.sfhover ul ul, #subnav li.sfhover ul ul ul {
left: -999em;
}

#subnav li:hover ul, #subnav li li:hover ul, #subnav li li li:hover ul, #subnav li.sfhover ul, #subnav li li.sfhover ul, #subnav li li li.sfhover ul {
left: auto;
}

#subnav li:hover, #subnav li.sfhover {
position: static;
}


Langkah selanjutnya adalah merubah susunan kode pada body :

<div id='header-wrapper'>
<b:section class='header' id='header' maxwidgets='1' showaddelement='no'/>
</div>

dengan kode dibawah ini :

<div id='header'>

<div class='headerleft'>
&lt;img src=&quot;http://i288.photobucket.com/albums/ll179/ahnning/header-CA-animasi.gif&quot; border=&quot;0&quot; alt=&quot;Photobucket&quot;&gt;
</div>

<div class='headerright'>

&lt;script type=&#39;text/javascript&#39;&gt;&lt;!--
google_ad_client = &quot;pub-7181952237540333&quot;;
google_ad_host = &quot;pub-1556223355139109&quot;;
/* 468x60, created 6/18/08 */
google_ad_slot = &quot;5864627181&quot;;
google_ad_width = 468;
google_ad_height = 60;
//--&gt;
&lt;/script&gt;
&lt;script src=&#39;http://pagead2.googlesyndication.com/pagead/show_ads.js&#39; type=&#39;text/javascript&#39;&gt;
&lt;/script&gt;

</div>

</div>


Headerleft pada magazine blogger "Edel2xMinima" merupakan background Animasi yang kita buat dengan Adobe Photoshop dan diupload di Photobucket dengan ukuran 475px X 100px (GIF). (akan dibahas selanjutnya bagaimana membuat Animasi header).

Headerrightnya merupakan kode Adsense dengan ukuran 468px X 60px


KODE TAMBAHAN NAVBAR DIBAWAH HEADER :

Selanjutnya kita tambahkan kode dibawah ini :

<div id='NavbarMenu'>
<div id='NavbarMenuleft'>
<ul id='nav'>
<li><a expr:href='data:blog.homepageUrl'>Home</a></li>
<li>
<a href='url anda'>Categori, misalnya Tutorial</a>
<ul>
<li><a href='url anda'>item tutorial anda</a></li>
</ul>
</li>
<li><a href='#'>item Post lainnya</a></li>
</ul>
</div>

<div id='NavbarMenuright'>
<form action='/search' id='searchform' method='get' style='display:inline;'>
<input id='searchbox' maxlength='255' name='q' onblur='if (this.value == &quot;&quot;) {this.value = &quot;Search this website...&quot;;}' onfocus='if (this.value == &quot;Search this website...&quot;) {this.value = &quot;&quot;}' type='text' value='Search this website...'/>
<input id='searchbutton' type='submit' value='GO'/>
</form>

</div>
</div>

<div style='clear:both;'/>

<div id='subnavbar'>
<ul id='subnav'>
<li>
<a href='#'>Community Events</a>
<ul>
<li>
<a href='#'>Sub Category #1</a>
<ul>
<li>
<a href='#'>Sub Sub Category #1</a>
</li>
<li>
<a href='#'>Sub Sub Category #2</a>
</li>
<li>
<a href='#'>Sub Sub Category #3</a>
</li>
</ul>
</li>
<li>
<a href='#'>Sub Category #2</a>
</li>
<li>
<a href='#'>Sub Category #3</a>
</li>
</ul>
</li>
<li>
<a href='#'>item anda</a>
</li>
<li>
<a href='#'>item Anda</a>
</li>
</ul>
</div>

<div style='clear:both;'/>

Pemasangan kode diatas, dibawah kode header diatas dan diatas kode :

<div id='content-wrapper'>

Silahkan dimodifikasi sendiri, dan jangan putus asa.

Mil-Spec Circuit Breakers

Development of the electronics world at this time increasingly sophisticated demands of experts in designing the product quality. Especially in the field of culture in military electronic systems.

Engineers who designed military vehicles and equipment to face the challenges, Circuit Breakers must design the right to protect the device in the computer that ensure reliable performance in mission-critical situation in their military operations.

Unfortunately, many experts assume that the circuit breaker will be ideal to provide protection if meet military specifications, but without the presence or Mil-Spec Circuit Breakers is not the most important election. In fact, designers have to ignore or even exceed Mil-Spec Circuit Breakers in many circuit-protection applications.

More than fifty active military specifications and hundreds of private industry specification applies to Circuit Breakers. However, the understanding of the basic characteristics of Circuit Breakers and a large operation to help designers select the circuit breaker in the most appropriate for their application.

Choosing the correct circuit breaker technology is very important for each application. There are four types of circuit breaker technology to choose from:

* Thermal;
* Thermal-magnetic;
* Magnetic, and
* High-performance.

If you need a military Circuit Breakers, the equipment must comply with all requirements mil-spec. Such as remote control Circuit Breakers (RCCB), which functions as a combination of relay and circuit breaker also considered, this device functions as the control circuits and high power control signal to the cockpit. The relay circuit breaker combination that should remove the power cord, and so will increase efficiency and reduce the weight of the entire system, and the number of components.

Mil-spec Circuit Breakers are available with a wide range of flexible and fully functional features, you can find on the internet.

28 Januari 2009

Need for Web Hosting Tutorials

The need for the Internet at this time is a factor of supporting a business online. When we create a website or blog for business, of course we need a Web Hosting plan we can support it. Setting up a web site hosting account to host your business Web site can be confusing.

We need a Web Hosting Tutorials to help understand the process and guides us through the steps to set up web hosting.

Web Hosting Tutorial covers all the basics of web hosting, how to choose a web host, domain names, and more. Much-needed general information page on the website hosting articles for beginners, to start learning about web hosting, To be able to obtain a better understanding, to learn about how the process of getting a web page or a web site full of computers that have been used for the web server, and the process domain name selection is good, the steps to register domain names and domain names that point to Web sites.

Several articles in the Web Hosting article as a comparison, in order to gain more information can be searched on the internet, so this could increase confidence in our ability to create the site.

As part of NaviSite marketing and product management team, we have some thoughts about the web hosting for the year 2009. Believe that conventional hosting sector will experience a dramatic transformation in 2009. Currently, economic conditions will place small businesses in danger as they struggle to keep pace in this highly competitive and market demand, business will come to realize the importance of relationships and find solutions that are more qualified. For that, we need the web hosting server that has a fast.

Thus, we can not be wrong in making a decision in choosing the Web Hosting services.

Prosedur Modifikasi MINIMA (II)

MENAMBAH TOPNAVBAR

Prosedure Modifikasi Minima bagian kedua kali ini merupakan lanjutan Prosedure modifikasi Minima bagian pertama yang membahas tentang bagaimana memodifikasi template minima menjadi "Edel2XMinima", kali ini kita akan membahas bagaimana menambahkan TopNavbar, yaitu ruang navigasi diatas Header.

Untuk meodifikasi ini, kita perlu menyembunyikan Navbar Blogger terlebih dahulu, pasang kode

#navbar-iframe {
height:0px;
visibility:hidden;
display:none
}

setelah kode berikut :

/* Use this with templates/template-twocol.html */


kemudian kita tambahkan kode berikut, diatas kode : ]]></b:skin>


/*topnavbar
------------------------*/
#topnavbar {
background: #2c4755;
width: 980px;
height: 30px;
color: #FFFFFF;
margin: 0px 0px 2px 0px;
padding: 0px;
}

#topnavbar a, #topnavbar a:visited {
font-size: 11px;
font-weight: bold;
color: #FFFFFF;
text-decoration: none;
}

#topnavbar a:hover {
text-decoration: underline;
}

#topnavbar p {
font-size: 11px;
font-weight: bold;
padding: 0px;
margin: 0px;
}

.topnavbarleft {
width: 250px;
float: left;
margin: 0px;
padding: 8px 0px 0px 10px;
}

.topnavbarright {
width: 600px;
float: right;
margin: 0px;
padding: 7px 10px 0px 0px;
text-transform: uppercase;
text-align: right;
}

.topnavbarright a img {
border: none;
margin: 0px 3px 3px 0px;
padding: 0px;
}


pada body kita tambahkan : topnavbar yang isinya realtime, post feed & comment feed dari blog kita.

rubah <body> dengan <body onLoad='goforit()'> lalu tambahkan kode real time dibawah ini :


&lt;script&gt;

var dayarray=new Array(&quot;Sunday&quot;,&quot;Monday&quot;,&quot;Tuesday&quot;,&quot;Wednesday&quot;,&quot;Thursday&quot;,&quot;Friday&quot;,&quot;Saturday&quot;)
var montharray=new Array(&quot;January&quot;,&quot;February&quot;,&quot;March&quot;,&quot;April&quot;,&quot;May&quot;,&quot;June&quot;,&quot;July&quot;,&quot;August&quot;,&quot;September&quot;,&quot;October&quot;,&quot;November&quot;,&quot;December&quot;)
function getthedate(){
var mydate=new Date()
var year=mydate.getYear()
if (year &lt; 1000)
year+=1900
var day=mydate.getDay()
var month=mydate.getMonth()
var daym=mydate.getDate()
if (daym&lt;10)
daym=&quot;0&quot;+daym
var hours=mydate.getHours()
var minutes=mydate.getMinutes()
var seconds=mydate.getSeconds()
var dn=&quot;AM&quot;
if (hours&gt;=12)
dn=&quot;PM&quot;
if (hours&gt;12){
hours=hours-12
}
if (hours==0)
hours=12
if (minutes&lt;=9)
minutes=&quot;0&quot;+minutes
if (seconds&lt;=9)
seconds=&quot;0&quot;+seconds
//change font size here
var cdate=&quot;&lt;small&gt;&lt;font color=&#39;000000&#39; face=&#39;Arial&#39;&gt;&lt;b&gt;&quot;+dayarray[day]+&quot;, &quot;+montharray[month]+&quot; &quot;+daym+&quot;, &quot;+year+&quot; &quot;+hours+&quot;:&quot;+minutes+&quot;:&quot;+seconds+&quot; &quot;+dn
+&quot;&lt;/b&gt;&lt;/font&gt;&lt;/small&gt;&quot;
if (document.all)
document.all.clock.innerHTML=cdate
else if (document.getElementById)
document.getElementById(&quot;clock&quot;).innerHTML=cdate
else
document.write(cdate)
}
if (!document.all&amp;&amp;!document.getElementById)
getthedate()
function goforit(){
if (document.all||document.getElementById)
setInterval(&quot;getthedate()&quot;,1000)
}

&lt;/script&gt;

kemudian cari kode <div id='header-wrapper'> lalu tambahkan kode dibawah ini di atas kode tersebut


<div id='topnavbar'>

<div class='topnavbarleft'>
<span id='clock'/>
</div>

<div class='topnavbarright'>

<p><a expr:href='data:blog.homepageUrl + &quot;feeds/posts/default&quot;'><img src='http://i288.photobucket.com/albums/ll179/ahnning/rssnatal.gif' style='vertical-align:middle'/></a><a expr:href='data:blog.homepageUrl + &quot;feeds/posts/default&quot;'>Posts</a>

<a expr:href='data:blog.homepageUrl + &quot;feeds/comments/default&quot;'><img alt='' src='http://i288.photobucket.com/albums/ll179/ahnning/rssnatal.gif' style='vertical-align:middle;margin-left:10px;'/></a><a expr:href='data:blog.homepageUrl + &quot;feeds/comments/default&quot;'>Comments</a></p>

</div>
</div>

(Bersambung.... )

27 Januari 2009

About MAILING LISTS

Mortgage mailing list and Marketing List are a key ingredient in a successful marketing campaign. When you put together the marketing campaign, you need a mailing list that provides information accurate, up-to-date information and Quick.

The team of marketing experts from the mailing list will identify the most likely to yield the maximum response to marketing campaigns.

Because many mailing-list with all categories, as Media group to promote the goods sold or bought the company, then created Marketing List and Mailing Leads in the company. this way the company can quickly and easily provide information about a product, and would also cost-effective

Group of experts in the field must have the experience, knowledge and expertise that can help you improve the response rates on marketing projects. Must be able to build a solid relationship in the broker industry, which means it can provide with the best possible price and highest deliverability rates in the mailing list.

In the midst of a smart consumer and tight competition, the group of experts will help you find, acquire, and retain customers.

American Heritage Data Corporation provides quality mailing lists, also can target your ideal customer with a cost effective mailing leads. If you have to qualify mortgage leads, here you will get the correct instructions

23 Januari 2009

Prosedur Modifikasi MINIMA ( Bag. I )

Prosedur modifikasi template MINIMA yang hasilnya menjadi Magazine Blogger "Edel2XMinima" adalah sebagai berikut :

1. Buat blog baru pada blogger, kemudian pilih minima. Dalam proses awal jangan centang kotak Expand. Kemudian cobalah membuat dua postingan sekaligus untuk mengetahui kondisi kolom posting saat kita modifikasi.

2. Langkah awal dalam proses modifikasi adalah, terlebih dahulu fokus kita pada pembagian ruang Main-wrapper & Sidebar . Mengingat pada bagian ini merupakan sasaran yang saya inginkan, sedangkan untuk bagian header dan footer belakangan, setelah kita berhasil dalam membagi ruang antara kolom posting dan sidebar.


3. Kita rubah dulu ukuran Header/footer-nya , coba perhatikan kode asli header & footer MINIMA :

#header-wrapper {
width:660px;
dst...... hingga }

kode footer :

/* Footer
----------------------------------------------- */
#footer {
width:660px;
clear:both;
dst...... hingga }

Ganti width:660px; dengan width: 980px
(Selanjutnya akan kita bahas pada modifikasi header MINIMA)

4. Saatnya memodifikasi Outer dan Main-wrapper, Cari kode dibawah ini :

/* Outer-Wrapper
----------------------------------------------- */
#outer-wrapper {
width: 660px;
margin:0 auto;
padding:10px;
text-align:$startSide;
font: $bodyfont;
}

Ganti width : 660px; menjadi width: 980px;


5. Dibawah kode diatas terdapat kode berikut :

#main-wrapper {
width: 410px; ( ganti ukurannya menjadi 640px)
float: $startSide;
word-wrap: break-word; /* fix for long text breaking sidebar float in IE */
overflow: hidden; /* fix for long non-text content breaking IE sidebar float */
}

#sidebar-wrapper {
width: 220px;( ganti ukurannya menjadi 310px)
float: $endSide;
word-wrap: break-word; /* fix for long text breaking sidebar float in IE */
overflow: hidden; /* fix for long non-text content breaking IE sidebar float */
}


Sisa 30px digunakan untuk ukuran Margin & Padding ( selanjutnya disebut M & P )


6. Sekarang kita akan membagi dan memodifikasi kolom Main-wrapper.

#main-wrapper {
width: 640px;
border-right:3px solid $bordercolor; ( ini adalah kode tambahan pembatas kanan, ketebalan 3px bisa anda rubah sesuai kemauan )
float: $startSide;
word-wrap: break-word; /* fix for long text breaking sidebar float in IE */
overflow: hidden; /* fix for long non-text content breaking IE sidebar float */
}


Tambahkan kode berikut :

#main-left {
width: 640px;
float: left;
margin: 4px 4px 0px 0px;
padding: 0px;
color: #000000;
background: $bgcolor;
border-right:.5px dotted $bordercolor; ( dotted = titik-titik, bisa anda rubah SOLID agar nampak utuh garisnya )
}

#main-left .widget {
margin:0 0 1.5em;
padding:0 1.5em 1.5em .75em;
}

#main-right{
float:right;
margin: 4px 4px 4px 4px;
padding: 0px;
background:$bgcolor;
width:220px; ( ini adalah lebar kolom kanan )
line-height:1.2em
}

#main-right h2{
margin-bottom:5px;
padding-bottom:5px;line-height:1.1em;
font:normal normal Trebuchet, Trebuchet MS, Arial, sans-serif;color:#996600;
}

#main-right img{margin-bottom:4px;border:1px solid #000000}

#main-right .widget {
margin:0 0 1.5em;
padding:0 1.5em 1.5em .75em; }

7. Cari kode :

.sidebar .widget, .main .widget {
border-bottom:1px dotted $bordercolor;
margin:0 0 1.5em;
padding:0 0 1.5em;
}

Hapus .main .widget


8. Kemudian cari kode : ]]></b:skin> dan tambahkan kode berikut dibawah kode tersebut.

<style type='text/css'>
<b:if cond='data:blog.pageType != &quot;item&quot;'>
#main-left {
width:400px;
}
.post-body img{
width:390px;
}
</b:if>
</style>

Kode ini untuk menampilkan kolom kiri pada ruang Main-Wrapper, ukuran 400px berasal dari 640 - 220 - 20 (M+P).


9. Langkah selanjutnya menuju pada bagian <body>, cari kode dibawah ini :

<div id='main-wrapper'>
<b:section class='main' id='main' showaddelement='no'>
<b:widget id='Blog1' locked='true' title='Posting Blog' type='Blog'/>
</b:section>
</div>

Perhatikan susunan setelah modifikasi :

<div id='main-wrapper'>

<div id='main-left'>
<b:section class='main' id='main-left' preferred='yes'>
<b:widget id='Blog1' locked='true' title='Posting Blog' type='Blog'/>
</b:section>
</div>

<div id='main-right'>
<b:if cond='data:blog.pageType != &quot;item&quot;'>
<b:section class='main-right' id='main-right' preferred='yes'/> ( jangan lupa memberi tanda "/" agar tidak error )
</b:if>
</div>

kode berwarna merah adalah kode modifikasi

Susunan Kode setelah dimodifikasi adalah sebagai berikut :

<div id='main-wrapper'>

<div id='main-left'>
<b:section class='main' id='main-left' preferred='yes'>
<b:widget id='Blog1' locked='true' title='Posting Blog' type='Blog'/>
</b:section>
</div>

<div id='main-right'>
<b:if cond='data:blog.pageType != &quot;item&quot;'>
<b:section class='main-right' id='main-right' preferred='yes'/>
</b:if>
</div>

<div id='sidebar-wrapper'>
<b:section class='sidebar' id='sidebar' preferred='yes'/>
</div>
<!-- spacer for skins that want sidebar and main to be the same height-->
<div class='clear'>&#160;</div>

</div> <!-- end content-wrapper -->

Selanjutnya kita preview, apabila masih tidak teratur cobalah rubah ukuran M & P-nya. Bila sudah berhasil silahkan save


to bo continued bin bersambung..............

Mockup Hijab Adobe Photoshop Tutorial - FREE FILE PSD

  Mockup Hijab Adobe Photoshop adalah tutorial tentang bagaimana cara merubah warna hijab maupun coraknya. Jika anda ingin mendownload file ...